Professional epoxy garage floor installation costs between $3 and $12 per square foot as of 2026-05-19, with most two-car garages in Wisconsin, Michigan, and Minnesota running $1,800–$4,800. Price varies by system type—vinyl flake, metallic, or broadcast quartz—plus surface prep requirements and square footage. The real deciding factor isn't just price, but whether you're getting commercial-grade 100% solids epoxy engineered for Northwoods winters or a watered-down product that peels within 18 months.
What Is the Average Cost of Professional Epoxy Garage Floor Installation?
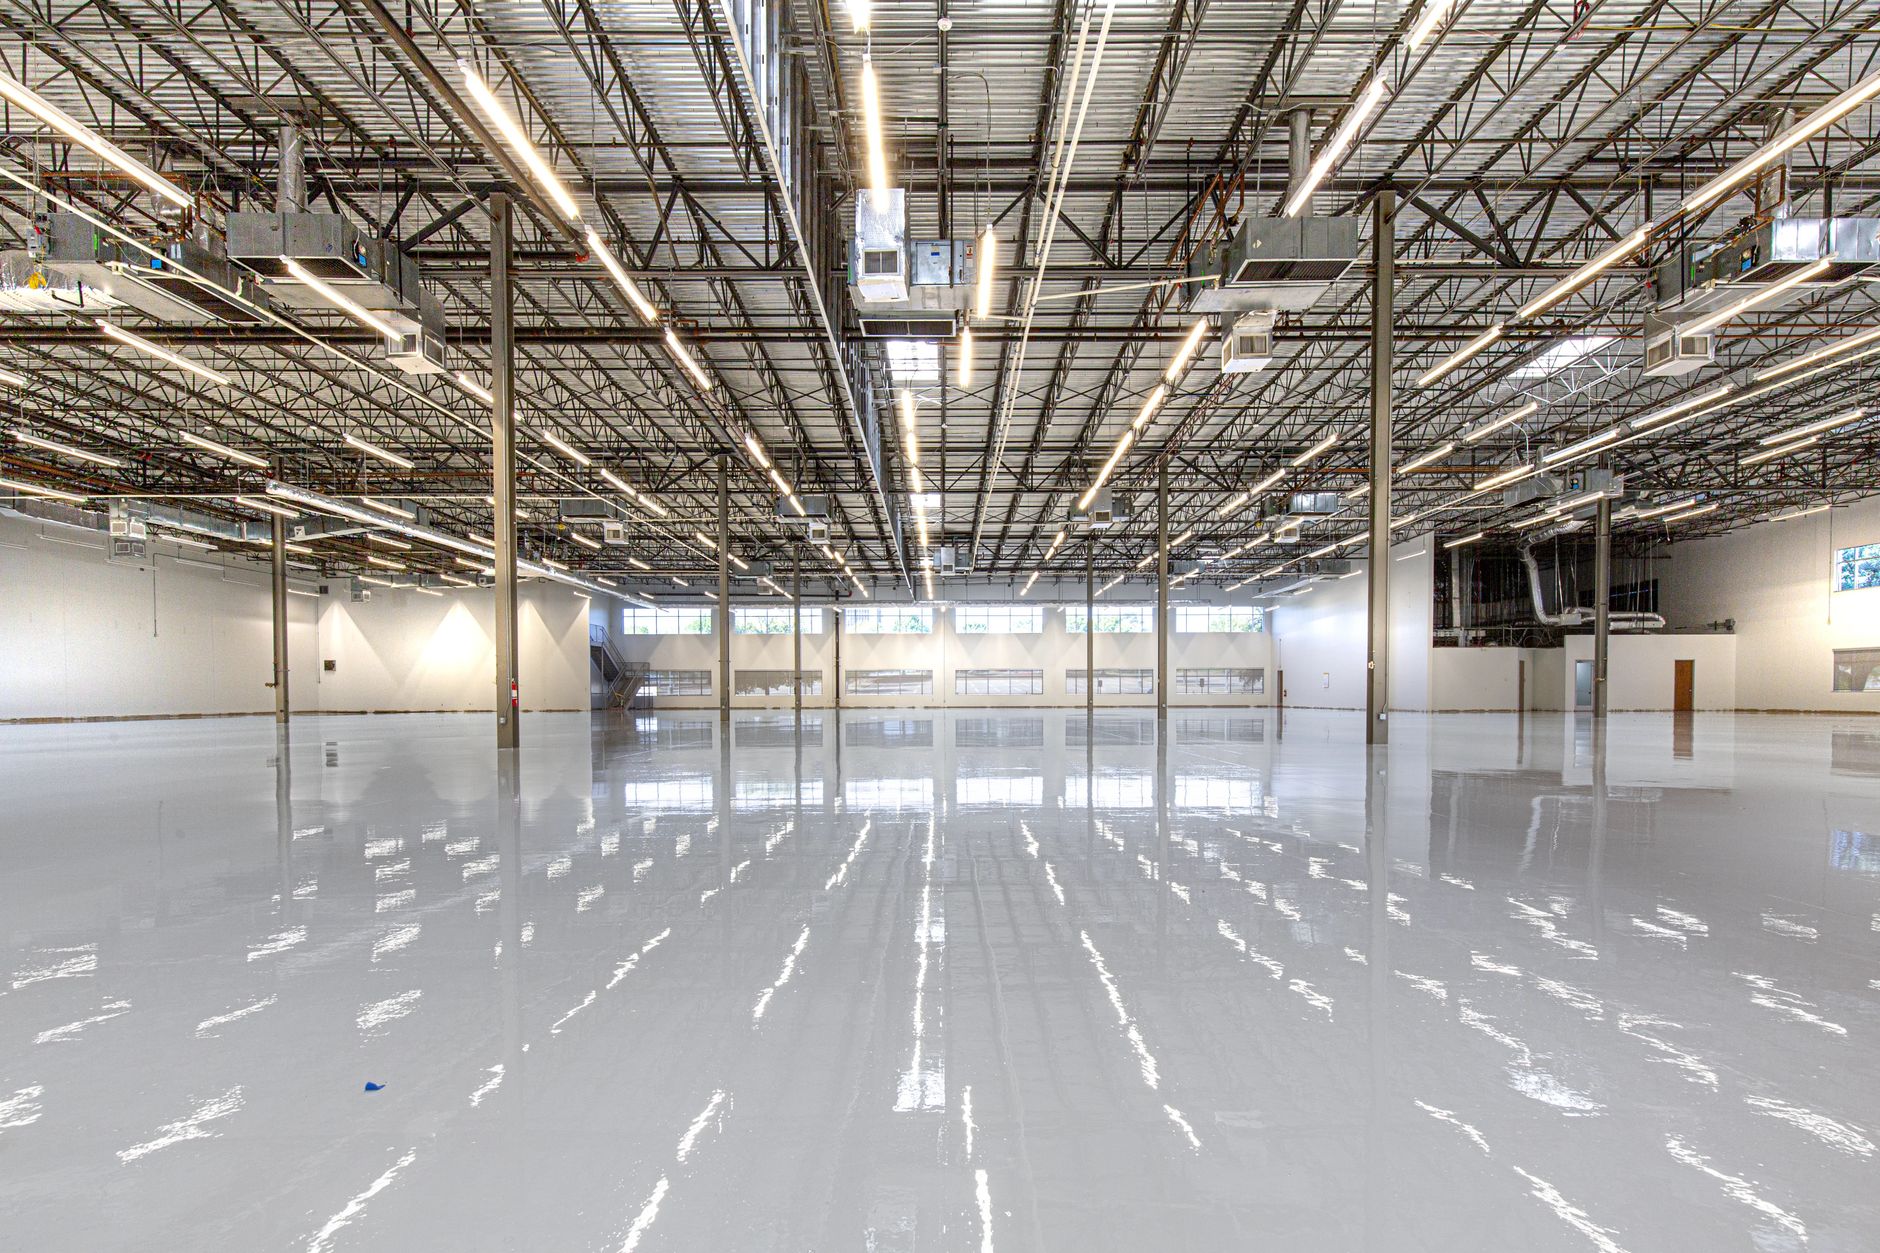
Professional epoxy garage floor installation ranges from $3 to $12 per square foot in 2026, depending on system complexity and materials quality. A standard two-car garage (400–600 square feet) costs $1,800–$4,800, while larger three-car garages (600–900 square feet) run $2,700–$10,800. These numbers reflect commercial-grade 100% solids epoxy, not the 30-50% solids products sold in big-box store kits.
The price difference between systems is substantial. Vinyl flake systems—the most popular choice for slip resistance and visual appeal—cost $4–$7 per square foot. Metallic finishes, with their reflective depth and unique patterns, run $8–$12 per square foot. Broadcast quartz systems, engineered for the highest traffic durability, sit at $6–$10 per square foot. All three systems from Revolution Epoxy use the same foundation: industrial-strength 100% solids epoxy that bonds permanently to concrete and resists the chemical assault of road salt, de-icers, and automotive fluids common in Northwoods garages.
Big-box epoxy kits might promise similar results for $50–$300, but the material quality tells a different story. Water-based or solvent-based formulas contain only 30-50% actual epoxy, resulting in thin coatings that lack chemical resistance and mechanical strength. Professional 100% solids epoxy goes down at 10-20 mils thickness versus 2-4 mils for consumer products—a difference you can feel underfoot and see in performance over decades, not months.
Cost Breakdown by Epoxy System Type
Vinyl flake systems cost $4–$7 per square foot and represent the most popular choice for residential garages in 2026. The textured surface from broadcasted vinyl chips provides slip resistance even when wet, crucial for Wisconsin, Michigan, and Minnesota winters when snow and ice melt on your garage floor. The flake layer also hides minor concrete imperfections and creates a showroom aesthetic that transforms drab concrete into something worth showing off. Color combinations are nearly limitless, from subtle earth tones to bold contrasts.
Metallic epoxy finishes run $8–$12 per square foot and deliver high-end visual drama. Metallic pigments create reflective depth and swirling patterns unique to each installation—no two floors look identical. This system appeals to homeowners treating their garage as an extension of living space or showcasing collector vehicles. The mirror-like finish requires a pristine concrete surface and expert application technique, which drives the higher price point. Despite the premium cost, metallic systems use the same 100% solids epoxy base and chemical-resistant topcoat as vinyl flake options.
Broadcast quartz systems cost $6–$10 per square foot and offer stone-like appearance with the highest mechanical durability. Colored quartz granules are broadcast into the epoxy base coat at full saturation, creating a texture similar to terrazzo or polished stone. This system handles heavy commercial traffic, making it ideal for homeowners who work on vehicles, store heavy equipment, or want a floor that can take abuse for 20+ years. The quartz layer provides additional slip resistance and UV protection compared to standard vinyl flake systems.
The material quality difference between professional and consumer-grade products comes down to chemistry. 100% solids epoxy means zero water, zero solvents—only reactive resin and hardener that cure into a dense, impermeable coating. This results in superior thickness (10-20 mils versus 2-4 mils), better chemical resistance, and permanent adhesion. Consumer products use water or solvents as fillers to reduce cost and improve ease of application, but those fillers evaporate during cure, leaving a thin, brittle coating vulnerable to peeling, especially under the thermal cycling and chemical exposure of Northwoods winters.
How Garage Size Affects Total Installation Price
A one-car garage (200–250 square feet) costs $800–$3,000 for professional epoxy installation in 2026. This smaller footprint benefits from economies of scale working against you—setup, prep equipment, and minimum labor costs represent a larger percentage of total price. However, one-car garages often serve as workshops or storage spaces where durability matters as much as in larger garages, making professional installation still worthwhile compared to DIY alternatives that fail within two years.
Two-car garages (400–600 square feet) cost $1,800–$4,800 and represent the sweet spot for cost efficiency. This is the most common residential garage size in Wisconsin, Michigan, and Minnesota, and contractors can complete installation in 1-2 days. At this square footage, material costs dominate over setup and mobilization expenses, giving you better value per square foot. Most Revolution Epoxy installations fall into this range, with vinyl flake systems at the lower end and metallic or quartz systems at the upper end.
Three-car garages (600–900 square feet) cost $2,700–$10,800 depending on system choice. Larger projects benefit from economies of scale—the per-square-foot price drops as project size increases because fixed costs (equipment rental, surface prep setup, travel) spread across more area. A 900-square-foot garage with vinyl flake might come in at $4–$5 per square foot versus $6–$7 for a 200-square-foot space using the same system. Larger garages also allow for creative design options like contrasting borders, multiple color zones, or integrated logos without disproportionate added cost.
What Factors Increase Professional Epoxy Installation Costs?
Surface preparation requirements represent the biggest cost variable in professional epoxy installation, potentially adding $1–$3 per square foot to base pricing. Concrete condition varies dramatically—new construction slabs need minimal prep, while decades-old garage floors may require extensive crack repair, oil stain removal, and diamond grinding to achieve proper surface profile. Revolution Epoxy includes thorough prep in every quote because skipping this step guarantees coating failure, but severely damaged concrete demands more labor and materials.
Removing existing coatings adds $2–$4 per square foot to project cost. Old paint, sealers, or failed epoxy must be mechanically removed using diamond grinders or shot blasters before new epoxy can bond. Chemical strippers work inconsistently and leave residues that interfere with adhesion. If your garage has previous coatings—even if they appear mostly worn away—factor removal into your budget. Half-removed coatings are worse than leaving it alone; epoxy will only bond where concrete is fully exposed, creating patchwork failures.
Custom color blends, logos, or decorative patterns add $200–$800 depending on complexity. Standard vinyl flake color combinations or solid metallic tones are included in base pricing, but multi-color blends, embedded logos, or geometric patterns require additional labor and material waste. Custom work also extends installation time. Most homeowners find standard color options deliver stunning results without custom pricing—Revolution Epoxy's standard palette is engineered for visual impact in residential settings.
Geographic labor rates in Wisconsin, Michigan, and Minnesota influence total cost but remain relatively consistent across the Northwoods region. Urban areas like Milwaukee, Madison, Minneapolis, and Detroit may run 10-15% higher than rural locations due to travel time and cost of doing business. However, professional epoxy installation requires specialized equipment and expertise not available from general handymen, so geographic price shopping has limits. Cheap quotes often signal inexperienced installers or inferior products rather than geographic cost advantages.
Basement moisture mitigation adds $1–$2 per square foot when concrete slabs show elevated moisture readings. Basements below grade frequently deal with hydrostatic pressure forcing moisture through concrete, which destroys epoxy adhesion from beneath. Professional installers test moisture using calcium chloride tests or moisture meters before installation. If readings exceed manufacturer specifications, a moisture-blocking primer or vapor barrier system is required. This extra step prevents the heartbreak of watching a beautiful new floor bubble and peel within months due to moisture issues.
Why Surface Preparation Drives Cost Variability
Diamond grinding creates the proper concrete surface profile (CSP) necessary for mechanical adhesion of epoxy coatings. The process uses rotating diamond abrasives to open concrete pores, remove surface laitance (weak cement paste), and create microscopic valleys for epoxy to key into. Proper grinding achieves CSP-2 or CSP-3 profile, which feels like 60-80 grit sandpaper. This costs more than acid etching (a cheaper method that leaves inconsistent results) but guarantees the substrate preparation that professional epoxy demands.
Concrete moisture testing is non-negotiable for professional installations, adding 30-60 minutes to prep time and $50–$100 to cost. Calcium chloride tests measure moisture vapor transmission from the slab over 24-72 hours, revealing whether conditions are suitable for epoxy. Installers who skip this step gamble with your money—moisture-related failures account for 40-50% of epoxy coating problems. Revolution Epoxy tests every slab because no topcoat, no matter how expensive, can overcome moisture problems in the substrate.
Crack and joint filling using flexible epoxy prevents telegraphing (cracks showing through the new coating) and allows for thermal expansion and contraction. Concrete cracks naturally—temperature swings, settling, and structural loads create hairline to significant fractures. Rigid epoxy will simply crack along the same lines unless cracks are filled with flexible repair compound first. Control joints (saw cuts in the concrete) require special flexible fillers that accommodate movement without breaking the coating. This repair work adds $1–$2 per linear foot of cracking but prevents future coating failure.
Oil contamination treatment is critical for garage floors. Automotive fluids penetrate deep into concrete pores, creating a barrier to epoxy adhesion. Surface grinding removes the top layer, but heavily contaminated areas may require chemical degreasers, steam cleaning, or even scarification (aggressive mechanical removal of the top concrete layer). Oil contamination is invisible to the eye once concrete dries, which is why professional installers perform bond tests in suspect areas. Skipping oil removal is the number-one cause of localized coating failure where vehicles were parked.
Proper surface preparation accounts for 70% of long-term coating durability. The actual epoxy application takes only hours, but prep work can span an entire day for a standard two-car garage. Professional installers budget time and equipment for comprehensive prep because they warranty their work—cutting corners on prep means callbacks and reputation damage. Revolution Epoxy includes diamond grinding, moisture testing, crack repair, and oil removal in every installation quote, eliminating the surprise charges and corner-cutting common with discount installers.
Additional Costs for Northwoods Climate Conditions
Salt-resistant topcoats are essential for Wisconsin, Michigan, and Minnesota garages where road salt and calcium chloride de-icers get tracked in daily during winter months. Standard epoxy can yellow or etch when exposed to concentrated de-icing chemicals, especially hot tire pickup—the phenomenon where warm tires pull chemicals into the coating. Polyaspartic or aliphatic polyurea topcoats provide chemical resistance that prevents this damage. These premium topcoats add $1–$2 per square foot but are non-negotiable for Northwoods applications.
Enhanced slip resistance becomes critical for wet and icy conditions when snow melts on your garage floor. Standard vinyl flake provides good traction, but serving the Northwoods region across Wisconsin, Michigan, and Minnesota means accounting for standing water, ice patches, and slushy conditions. Additional aluminum oxide or polymer grit can be broadcast into the topcoat for aggressive slip resistance, though most homeowners find properly installed vinyl flake or quartz systems provide adequate traction without sacrificing the smooth, easy-to-clean surface that makes epoxy attractive.
UV-stable clear coats prevent yellowing and chalking in garages with windows or doors that allow sunlight exposure. Standard aliphatic polyurethane topcoats are UV-stable, but cheaper aromatic formulas yellow within 6-12 months of sun exposure. This distinction matters for garage-to-house entry areas, workshops with large windows, or partially covered spaces. UV-stable topcoats cost no more when specified from the start but represent a significant portion of why professional systems outperform DIY products that use whatever cheapest sealer the manufacturer could source.
Northwoods winters combine freeze-thaw cycling (concrete expands and contracts daily), chemical assault (road salt, de-icers, antifreeze), and mechanical abuse (snow blower traffic, studded tires) that destroy inferior coatings within one season. Professional systems engineered for these conditions use flexible additives that accommodate thermal cycling, chemical-resistant topcoats that shed salt and de-icers, and thick mil builds (10-20 mils) that resist mechanical wear. This engineering isn't found in consumer products designed for temperate climates and light use. The modest upcharge for climate-specific materials—$0.50–$1 per square foot—prevents total coating failure.
How Does Professional Epoxy Compare to DIY Kit Pricing?
DIY big-box epoxy kits cost $50–$300 for materials to cover a two-car garage, creating an appealing upfront price comparison against professional installation at $1,800–$4,800. However, these kits use 30-50% solids water-based or solvent-based formulas that go down thin (2-4 mils) and lack the chemical resistance, mechanical strength, and adhesion of commercial-grade 100% solids systems. The labor cost savings—$600–$1,200 you'd pay for professional installation—gets wiped out when the coating fails and requires re-application every 2-3 years.
The failure rate for DIY epoxy installations exceeds 60-70% within 18 months, primarily due to inadequate surface preparation or inferior product chemistry. Homeowners lack diamond grinding equipment, moisture meters, and proper ventilation systems necessary for professional results. Even with perfect application technique, consumer-grade products can't match the performance of 100% solids industrial epoxy. Hot tire pickup, road salt damage, and peeling at edges plague DIY installations because the coating is simply too thin and chemically vulnerable to survive real-world conditions.
Professional 100% solids epoxy lasts 15-20+ years in Wisconsin, Michigan, and Minnesota garages when properly installed. This longevity comes from three factors: substrate preparation (diamond grinding, moisture control), material quality (no water or solvents, 10-20 mil thickness), and proper topcoat selection (polyaspartic or polyurea with UV and chemical resistance). A one-time professional installation at $1,800–$4,800 compares favorably against 4-5 DIY re-applications over the same period at $200–$1,500 total materials cost plus 15-20 total days of your labor.
Total cost of ownership over 10 years reveals the true economics. DIY approach: initial kit $200, plus three re-applications at $200 each = $800 in materials, plus 20 days of labor (stripping failed coating, prepping, applying new coating), plus disposal of failed materials. Professional approach: one installation at $3,000, zero maintenance beyond occasional mopping, zero re-coating required. Factor in the opportunity cost of your time and the visual consistency of a showroom floor that never looks worn or patchy, and professional installation delivers better value even before considering performance advantages.
Why 100% Solids Epoxy Costs More Upfront but Saves Long-Term
100% solids epoxy contains zero water and zero solvents—only reactive resin and hardener that chemically bond into a dense, impermeable coating. This chemistry costs more to manufacture because you're paying for actual epoxy, not cheap fillers. Consumer products use water or solvents (50-70% of the can's volume) to reduce material costs and make the product easier to apply with a roller. Those fillers evaporate during cure, leaving behind a coating that's 50-70% thinner than what you applied—often just 2-4 mils dry film thickness.
The thickness difference is dramatic and consequential. Professional 100% solids systems cure to 10-20 mils dry film thickness, creating a robust coating that resists chemical attack, mechanical wear, and thermal stress. This thickness provides depth for decorative elements—vinyl flakes embed partially into the coating rather than just sitting on top, creating dimensional texture. DIY thin-film coatings wear through to bare concrete in high-traffic areas within 12-18 months, showing tire tracks and foot traffic patterns.
Chemical resistance to gasoline, oil, antifreeze, and road salt separates professional from consumer products. 100% solids epoxy creates a cross-linked polymer network dense enough that automotive fluids and de-icing chemicals can't penetrate. Water-based consumer epoxies have insufficient cross-link density—chemicals wick into the coating, breaking down the polymer bonds and causing yellowing, softening, and eventual delamination. This is why DIY coatings fail catastrophically in winter: road salt and calcium chloride attack the coating from the surface while moisture attacks from below.
Freeze-thaw cycle durability depends on coating flexibility and adhesion strength. Professional systems include flexibilizers that allow the coating to expand and contract with concrete through daily temperature swings without cracking. The superior mechanical adhesion from proper surface prep and 100% solids chemistry means the coating moves with the concrete rather than separating. Consumer products lack flex additives and achieve only minimal adhesion, leading to edge peeling and delamination during the first winter when thermal cycling is most severe.
One professional installation eliminates the recurring DIY cycle of application, failure, coating removal, and re-application. This matters especially for time-constrained homeowners who'd rather spend weekends enjoying their garage than maintaining it. Revolution Epoxy completes installations in 1-2 days with 24-hour cure to drive-on—you sacrifice one weekend day and get a floor that performs for two decades. DIY projects consume 3-5 days (longer if removing failed coating), require multiple trips to the store for additional materials, and deliver results that look acceptable for 6-12 months before degradation becomes visible.
What Is Included in a Professional Epoxy Installation Quote?
Surface preparation including diamond grinding and crack repair forms the foundation of every legitimate professional quote. This step opens concrete pores, removes surface contaminants, and creates the mechanical tooth necessary for permanent adhesion. Crack repair using flexible epoxy fillers prevents telegraphing and allows for thermal expansion. Quotes that list "minimal prep" or "acid wash included" as the prep method are red flags—these approaches don't create adequate surface profile for professional-grade epoxy. Expect surface prep to represent 40-50% of installation time.
Primer coat application provides an additional adhesion layer between prepared concrete and the epoxy base coat, particularly important for older slabs, high-moisture conditions, or oil-contaminated areas. Not all systems require separate primer—some 100% solids epoxies self-prime—but when included, primer adds 2-4 hours to installation time and $0.50–$1 per square foot to cost. The primer seals the concrete surface and provides uniform porosity for the base coat, ensuring consistent color and adhesion across the entire floor.
Base epoxy coat using 100% solids commercial-grade material goes down at 10-15 mils wet thickness, curing to approximately 10 mils dry. This is the structural layer that bonds to concrete and provides chemical resistance, mechanical strength, and impact resistance. Application requires notched squeegees and spiked shoes to achieve proper mil build and work out air bubbles. The base coat is typically pigmented to match your chosen color system, though the decorative layer (flake, metallic, or quartz) dominates the final appearance.
Decorative layer—vinyl flake broadcast, metallic pigments, or broadcast quartz—goes down while the base coat is still wet and tacky. Vinyl flake is broadcast by hand to achieve desired density (light, medium, full, or heavy broadcast), then excess flake is scraped and vacuumed before topcoat. Metallic systems use troweling and special application techniques to create the characteristic swirls and depth. Broadcast quartz is applied to full saturation, creating a continuous stone-like surface. This decorative step typically adds 2-4 hours to installation time.
Polyaspartic or polyurea topcoat provides the wear surface, UV protection, and chemical resistance that determines long-term durability. This clear coat goes down at 4-6 mils and cures rapidly—often within 12-24 hours to drive-on hardness. UV-stable aliphatic formulas prevent yellowing, while chemical-resistant formulas shed road salt and de-icers without etching. The topcoat can be applied in satin or high-gloss finish depending on preference. Some installers apply two topcoat layers for high-traffic or commercial applications, adding $0.75–$1.50 per square foot.
Cleanup and curing time are included in professional quotes but often overlooked by homeowners comparing prices. Installers remove all equipment, vacuum flake debris, and leave the space clean and ready to use once cured. Fast-cure polyaspartic topcoats allow 24-hour return to service for foot traffic and light vehicle use, full cure in 72 hours. This rapid turnaround means minimal disruption—park on the street one night, return to a transformed garage the next day. DIY projects require 5-7 days cure time and leave cleanup to you.
Warranty details vary by installer but typically include satisfaction guarantees on workmanship and material performance. Revolution Epoxy warranties against delamination, peeling, and coating failure under normal use conditions, excluding damage from concrete cracking or structural movement. Legitimate professional warranties are written, specific about what's covered, and backed by an established company that will be around to honor claims. Verbal warranties or generic "lifetime" claims without specifics are meaningless—get warranty terms in writing before signing.
Installation Timeline and Labor Costs
Professional epoxy installation takes 1-2 days for a standard two-car garage, dramatically faster than DIY projects that stretch 3-5 days when accounting for multiple coats, cure times, and mistakes requiring re-work. Day one focuses on surface preparation, primer (if needed), base coat application, and decorative layer broadcast. This phase is labor-intensive, requiring grinding equipment, vacuum systems, and multiple team members. Day two involves scraping excess flake, topcoat application, and final cleanup. The compressed timeline is possible due to fast-cure polyaspartic topcoats and professional-grade equipment.
Day one activities include moving contents (installers typically don't move items—expect to clear the space beforehand), diamond grinding the entire floor, crack and joint repair, cleaning and vacuuming, moisture testing, primer application if required, base coat squeegee application, and decorative element broadcast while base coat is wet. This sequence takes 6-10 hours depending on garage size and condition. The prep phase generates substantial dust despite vacuum systems, so adjacent spaces should be sealed with plastic sheeting.
Day two begins with scraping excess vinyl flake or quartz from the surface once the base coat has cured overnight (6-8 hours). This creates a smooth, even substrate for the topcoat. After final vacuuming, the polyaspartic or polyurea topcoat is rolled or squeegeed across the entire floor in sections, maintaining a wet edge to prevent lap marks. Additional slip-resistant aggregate can be broadcast into the wet topcoat if specified. The topcoat requires 12-24 hours to cure to drive-on hardness, 72 hours to full cure.
Labor accounts for 40-50% of total professional installation cost, with the remainder split between materials (30-35%) and equipment, overhead, and profit margin (15-25%). A two-person crew charging $3,000 for a two-car garage might allocate $1,200-$1,500 to labor (equivalent to $600-$750 per person for 10-12 hours of skilled work), $900-$1,050 to materials (epoxy, flake, topcoat, primers), and $750-$900 to equipment rental, vehicle costs, insurance, and business profit. This breakdown explains why professional installation can't compete on price with DIY materials alone—you're paying for expertise, equipment, and guaranteed results.
Fast polyaspartic cure enables 24-hour drive-on capability, a critical advantage over older epoxy systems requiring 5-7 days to full cure. Polyaspartic technology uses aliphatic isocyanate chemistry that cross-links rapidly even at low temperatures, making it ideal for Wisconsin, Michigan, and Minnesota installations where temperature control is challenging. The fast cure minimizes dust accumulation, eliminates extended garage outage, and allows the contractor to complete more jobs per week (reducing scheduling delays for homeowners). This technology costs more per gallon but delivers better customer experience and superior topcoat performance.
How to Get an Accurate Epoxy Garage Floor Cost Estimate
Measure garage square footage by multiplying length times width in feet. Most two-car garages measure 20-24 feet wide by 20-24 feet deep (400-576 square feet), but verify your dimensions—protruding utility closets, irregular angles, or attached workshop spaces affect total area. Measure at floor level rather than at doorway, since garage dimensions often taper. Add 5-10% to account for material waste and coating that wraps up walls slightly. Accurate square footage prevents surprise charges when the quoted price was based on assumptions.
Assess concrete condition honestly before requesting quotes. Walk the floor looking for cracks wider than hairline, oil stains that penetrated rather than sitting on surface, existing coatings (paint, sealer, previous epoxy), spalling or scaling (concrete surface flaking), and significant height variations or drainage issues. Take photos of problem areas. Professional installers will inspect in person, but identifying issues upfront helps set realistic cost expectations and prevents the "bait and switch" where a low quote jumps after on-site inspection reveals extensive prep requirements.
Determine system preference based on your priorities. Choose vinyl flake for slip resistance, visual warmth, and the most cost-effective showroom transformation ($4-$7 per square foot). Select metallic finishes for dramatic high-end aesthetics and unique reflective patterns when budget allows ($8-$12 per square foot). Opt for broadcast quartz for maximum durability and stone-like appearance when the garage serves as heavy-use workshop or commercial space ($6-$10 per square foot). All three systems use the same 100% solids epoxy foundation and perform equally well; choose based on aesthetics and budget rather than durability concerns.
Request on-site inspection from Revolution Epoxy for moisture testing and comprehensive prep assessment. Phone or email quotes based on square footage alone miss critical details that affect cost and feasibility. Legitimate installers provide free on-site estimates that include moisture meter readings, surface condition evaluation, and discussion of your aesthetic preferences. Expect the inspector to spend 20-30 minutes examining your garage, asking about current use, and explaining system options. Pressure to sign immediately is a red flag—professional estimates remain valid for 30-60 days.
Get itemized written quotes including materials (brand names, solids content, mil thickness), labor (prep methods, number of coats, timeline), warranty terms, and payment schedule. Beware quotes listing only total price without breakdown—this makes comparison shopping impossible and hides where corners might be cut. Written quotes should specify 100% solids epoxy, polyaspartic or polyurea topcoat, diamond grinding prep, and installation timeline. Compare not just total price but materials quality and scope of prep work. The cheapest quote often signals inferior materials or inadequate prep, both guaranteed to fail within 2-3 years.
Questions to Ask Before Hiring an Epoxy Installer
Do you use 100% solids epoxy or water-based products? This single question separates professional from amateur installers. 100% solids means commercial-grade material that lasts 15-20+ years; water-based means consumer-grade products that peel within 2-3 years. Legitimate installers specify solids content and can provide product data sheets. If the installer doesn't know or deflects with "professional-grade" without specifics, walk away. Get a free quote from Revolution Epoxy and compare materials specifications—transparency about products used is standard practice.
What mil thickness is applied? Professional systems deliver 10-20 mils dry film thickness (base coat plus topcoat). DIY and low-quality professional jobs apply 2-4 mils total. Mil thickness directly correlates with durability, chemical resistance, and longevity. Installers should specify both wet and dry mil build for base coat and topcoat separately. If they can't answer this question or claim "as thick as needed," it indicates lack of professional standards and training.
Is surface prep included or extra? Comprehensive diamond grinding, crack repair, and moisture testing should be included in the quote, not added as surprise charges. Some installers quote low base prices, then add $1-$3 per square foot for "necessary prep" after inspection. This bait-and-switch tactic makes comparison shopping difficult. Reputable installers include all prep work in the base quote after on-site inspection, with additional charges only for unexpected issues discovered during installation (severe concrete damage hidden under coatings).
What topcoat is used—polyaspartic, polyurea, or epoxy? Polyaspartic and polyurea are aliphatic (UV-stable, won't yellow) and fast-curing, making them superior topcoats for garage applications. Some installers use cheap aromatic polyurethane or additional epoxy layers as topcoat—these yellow in sunlight and lack the chemical resistance needed for road salt and de-icers. The topcoat determines 60% of the floor's long-term appearance and durability, so knowing the specific product matters. Brand names like Protective Industrial Polymers, Rust-Oleum RockSolid (commercial line), or similar professional products indicate quality.
Do you engineer for Northwoods winters? Wisconsin, Michigan, and Minnesota conditions demand salt-resistant topcoats, flexible formulations for freeze-thaw cycling, and enhanced slip resistance. Installers unfamiliar with regional climate challenges may use systems designed for temperate climates that fail under winter conditions. Revolution Epoxy specifically engineers installations for Northwoods winters—salt exposure, calcium chloride de-icers, studded tire traffic, and daily freeze-thaw cycles during shoulder seasons. Regional expertise prevents premature coating failure.
What warranty do you offer? Professional installers provide written warranties covering delamination, peeling, and coating failure for 5-15 years depending on product system. Warranty should specify what's covered (workmanship and materials, not concrete structural issues), claim process, and installer contact information. Generic "lifetime" warranties without specific terms are marketing gimmicks. Be wary of installers who've been in business less than three years—a long warranty is meaningless if the company doesn't exist to honor it.
Can I see photos of local installations? Established professional installers maintain photo portfolios of completed projects, ideally in your geographic area. Photos demonstrate aesthetic options, quality of workmanship, and proof the company regularly completes installations. Before-and-after photos of similar garage conditions (age, concrete quality, existing coatings) show how your project might turn out. Ask for references from customers whose installations are 3-5 years old—recent work always looks great, but long-term performance reveals true quality. Resistance to providing references or photos suggests poor track record.
Frequently Asked Questions
How much does epoxy flooring cost per square foot in 2026?
Professional epoxy garage floor installation costs between $3 and $12 per square foot as of 2026-05-19. Vinyl flake systems run $4–$7 per square foot, metallic finishes cost $8–$12 per square foot, and broadcast quartz systems range from $6–$10 per square foot. The price depends on system type, surface prep needs, and materials quality. Revolution Epoxy uses commercial-grade 100% solids epoxy engineered for Northwoods winters, which costs more upfront but lasts 15-20+ years compared to big-box kits that fail within 2-3 years.
What is the total cost to epoxy a two-car garage?
A standard two-car garage (400–600 square feet) costs between $1,800 and $4,800 for professional epoxy installation in 2026. The final price depends on which system you choose: vinyl flake (most popular, slip-resistant) sits at the lower end, while metallic finishes (high-end, reflective) run higher. This includes surface preparation, primer, 100% solids epoxy base coat, decorative layer, and UV-stable topcoat. Revolution Epoxy completes most two-car garages in 1-2 days with drive-on readiness in 24 hours.
Is professional epoxy worth the cost compared to DIY kits?
Yes. DIY epoxy kits cost $50–$300 but use 30-50% solids formulas that peel within 18 months, especially under Northwoods winter conditions like road salt and de-icers. Professional 100% solids epoxy costs $1,800–$4,800 for a two-car garage but lasts 15-20+ years without re-coating. Over 10 years, DIY requires 4-5 re-applications ($200–$1,500 plus labor), while professional installation is one-and-done. Revolution Epoxy's commercial-grade systems are engineered specifically for Wisconsin, Michigan, and Minnesota climates, offering salt resistance and anti-slip properties DIY products can't match.
What drives up the cost of professional epoxy installation?
Surface preparation is the biggest cost variable. Crack repair, oil stain removal, and concrete grinding add $1–$3 per square foot. Removing old coatings (paint, sealers) can add $2–$4 per square foot. Custom colors or logos cost $200–$800 extra. In basements, moisture mitigation adds $1–$2 per square foot. Proper prep accounts for 70% of long-term durability. Revolution Epoxy includes comprehensive prep in every quote